Introduction
Having a contact form is almost standard on any corporate website or personal site.
And what does this usually mean? We have a form in the frontend that, upon submission, makes a request to a backend (our own or a third-party) responsible for processing the data and sending an email to a contact account.
So far, so good. But if we work with Astro in SSG (Static Site Generation) mode, things get a bit trickier.
In an Astro SSG project, everything we have is HTML and JS served to the frontend. And nowadays, to send an email, we need an API token or credentials that must be kept in a secure environment (on the server side) to prevent someone from stealing them and sending emails on our behalf.
The usual option would be to set up our own backend (with Express, Fastify, Laravel, etc.) or rely on external services (like Formspree, Netlify Forms, or Zapier).
This works, but it has several drawbacks:
- We’re using overkill infrastructure for something as simple as a form.
- You need to configure and deploy a server or integrate the frontend inside the backend.
- It involves dealing with CORS, routes, security, and authentication.
- We add maintenance and complexity to the project.
- Or we become tied to a provider with its own limitations.
So, isn’t there a simpler way?
Yes: Astro Server Actions.
This feature lets us:
- Keep our Astro SSG project.
- Define server-side actions within the same project.
- Handle forms without spinning up a full backend.
How it works
Astro offers server adapters that allow you to configure a mini server or serverless functions inside the same project. Among the official ones you’ll find:
- Node.js: a continuous HTTP server, ideal for VPS, App Service, or Docker.
- Vercel: serverless functions (each request runs the code in an isolated function).
- Netlify: similar serverless functions.
- Cloudflare: workers or pages functions (no Node, very fast and edge-distributed).
When we deploy the project, this mini server / functions process the actions we define in our Astro code.
In short: we have a microserver or serverless functions integrated into the same Astro project. A purely static hosting won’t be enough anymore—you’ll need an environment that supports Node.js or the adapter you chose.
To send emails, we can use a specialized service such as Resend, which offers a modern, secure, and easy-to-integrate API.
Let’s get to work
We’re going to build a complete example: a fully functional contact form using:
- Astro 🪐
- Server Actions
- Node.js adapter
- Resend for email delivery
By the end you’ll have a working form—no extra frameworks or complex setups.
⚙️ 1. Initial setup
Time to open Visual Studio Code (or your favorite editor) and get to it.
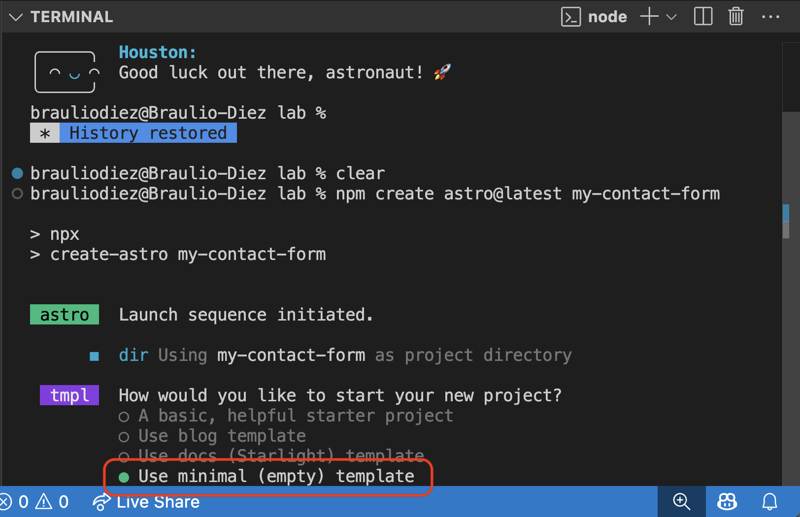
Open a terminal and create a new Astro project:
npm create astro@latest my-contact-formIf you already have an empty folder, you can use
npm create astro@latest .to initialize it right there.
Choose the use minimal (empty) template option.
Then let it install the dependencies.
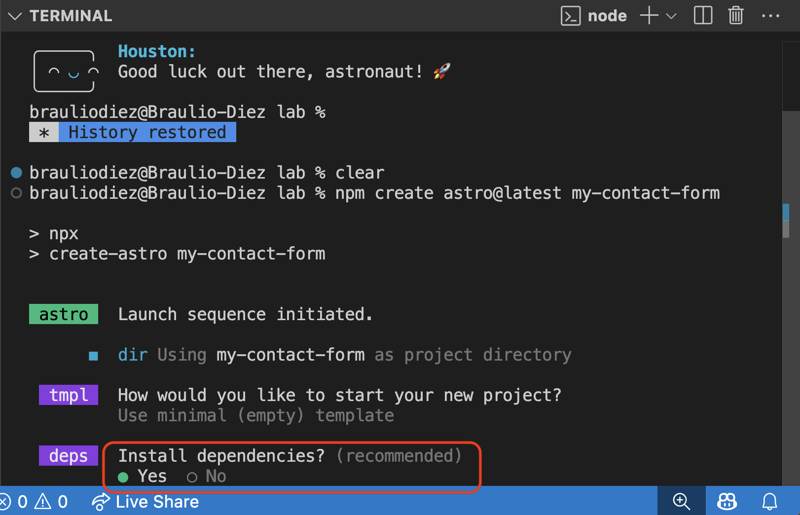
If you skip this step, you can always run
npm installlater.
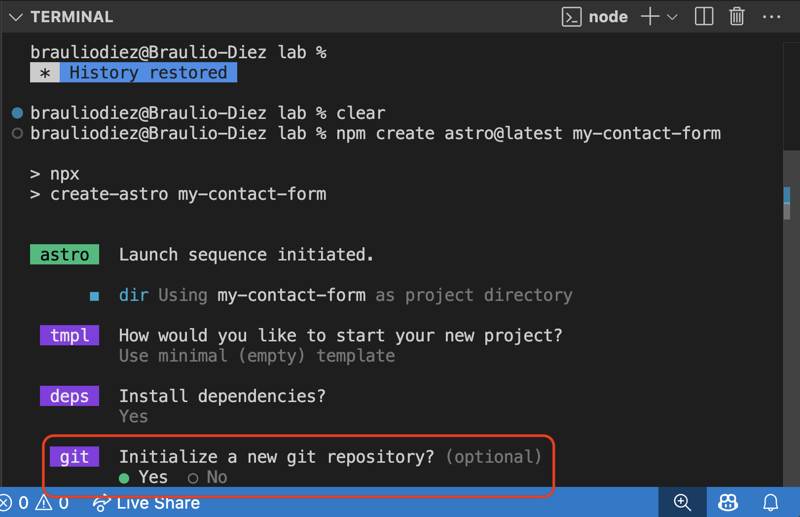
And initialize a Git repository (optional).
Navigate to the project directory and start the dev server:
cd my-contact-form
npm run dev
You can also open the folder from Visual Studio Code and run
npm run devdirectly.
⚙️ 2. Configure Server Actions
We now have our blank project up and running. Let’s configure Server Actions to define server-side actions.
In our case we’ll install the Node.js adapter to avoid being tied to any particular cloud provider (feel free to choose another one depending on your deployment platform). Run the following command from the terminal:
npm install @astrojs/nodeNow we need to tell our Astro project to use this adapter. Update the astro.config.mjs configuration file:
// @ts-check
import { defineConfig} from 'astro/config';
+ import node from '@astrojs/node';

// https://astro.build/config
export default defineConfig({
+  adapter: node({
+    mode: 'standalone',
+  }),
});
The
standalonemode creates an executable server. If you prefer to integrate it into an existing Node.js server, usemiddlewaremode.
✉️ 3. Install Resend
There are many options and platforms for sending emails—Sendgrid, Postmark, Mailgun, Amazon SES, etc.
In this example we’ll use Resend, a modern alternative with a simple API and a free plan of up to 1,000 emails per day.
A quick summary of the steps we’ll follow:
- If you don’t have one already, create an account and get your API key so you can send emails (for the example that’s enough; if you want to send from your own domain, you’ll need to verify it, etc.).
- Install Resend’s official SDK.
- Add the required environment variables.
- Create the form in Astro.
- Create a server action that will be responsible for sending the email.
- Connect the form’s POST or submit event with the action.
Let’s do it. In the terminal, install the official SDK:
npm install resendNow let’s create a .env file at the project root to store the required environment variables—in this case:
- Your account’s Resend API key (if you create a free account, you can use the one they provide).
- The email address that will send the messages (it must be registered as a Domain in Resend—for a quick test you can use
onboarding@resend.dev). - The email address that will receive the messages (use your own email for testing; if you don’t see the email, check your spam folder).
.env
RESEND_API_KEY=your_api_key_here
FROM_EMAIL=your_verified_email_here
TO_EMAIL=destination_email_here
In this example,
FROM_EMAILis the address that will send the messages (it must be registered as a Domain in Resend). For a quick test you can useonboarding@resend.dev.
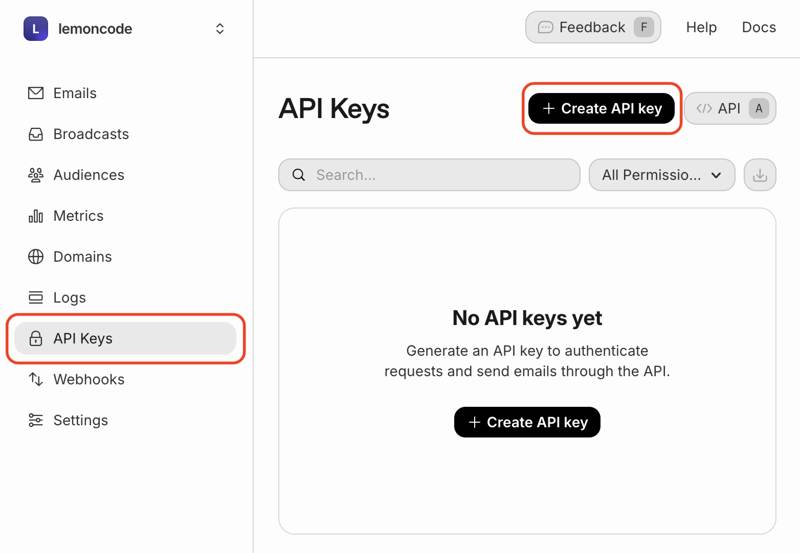
Resend provides the API key when you create your account, but be careful—you must copy it locally and you won’t be able to see it again. If you lose it, you’ll need to generate a new one. If you need to generate a new key, the process is simple: go to the API Keys section in your Resend account and create a new one.
To use these environment variables in our Astro project (with proper typing, and clearly separated between client and server), let’s add the configuration in astro.config.mjs:
- import { defineConfig } from 'astro/config';
+ import { defineConfig, envField } from 'astro/config';
import node from '@astrojs/node';

export default defineConfig({
  adapter: node({
    mode: "standalone",
  }),
+  env: {
+    schema: {
+      RESEND_API_KEY: envField.string({
+        context: 'server',
+        access: 'secret',
+      }),
+      FROM_EMAIL: envField.string({
+        context: 'server',
+        access: 'secret',
+      }),
+      TO_EMAIL: envField.string({
+        context: 'server',
+        access: 'secret',
+      }),
+    },
+  },
});
Here we indicate that these environment variables are server-side (context: 'server') and secret. To import these variables from an .astro file, we first need to compile the project so Astro generates types for them.
Run a build so the types for these environment variables are generated:
npm run build📝 4. Create the form in Astro
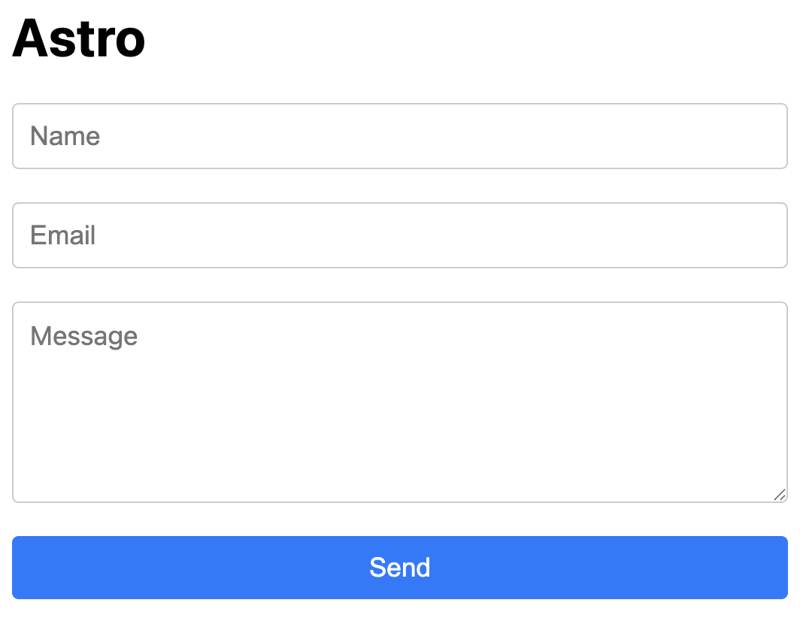
Create a simple form in src/pages/index.astro with name, email, and message fields.
<html lang="en">
  <head>
    <meta charset="utf-8" />
    <link rel="icon" type="image/svg+xml" href="/favicon.svg" />
    <meta name="viewport" content="width=device-width" />
    <meta name="generator" content={Astro.generator} />
    <title>Astro</title>
  </head>
  <body>
    <h1>Astro</h1>
    <h1>Astro</h1>
+    <form method="POST">
+      <input name="name" type="text" placeholder="Name" required />
+      <input name="email" type="email" placeholder="Email" required />
+      <textarea name="message" placeholder="Message"></textarea>
+      <button type="submit"> Send </button>
+    </form>
  </body>
</html>

+<style>
+  body {
+    font-family: system-ui, sans-serif;
+  }
+  form {
+   margin-left: auto;
+    margin-right: auto;
+    display: flex;
+    flex-direction: column;
+    gap: 20px;
+    max-width: 500px;
+    margin-top: 20px;
+
+    input {
+      padding: 10px;
+      font-size: 16px;
+      border: 1px solid #ccc;
+      border-radius: 4px;
+    }
+
+    textarea {
+      font-family: inherit;
+      padding: 10px;
+      font-size: 16px;
+      border: 1px solid #ccc;
+      border-radius: 4px;
+      min-height: 100px;
+    }
+
+    button {
+      padding: 10px;
+      font-size: 16px;
+      background-color: #007bff;
+      color: white;
+      border: none;
+      border-radius: 4px;
+      cursor: pointer;
+    }
+
+    button:hover {
+      background-color: #0056b3;
+    }
+  }
+</style>
This is a simple form with basic styles. We’ll add functionality later.
🛠️ 5. Create the server action
Back to the backend side: time to define the action that will be executed when the form is submitted.
Astro favors convention over configuration, so server actions are defined in files inside the src/actions folder. Under that folder, create an index.ts file to define our action that sends the email (you can define more than one action in this file):
src/actions/index.ts
import { Resend } from "resend";
import { defineAction } from "astro:actions";
import { RESEND_API_KEY, FROM_EMAIL, TO_EMAIL } from "astro:env/server";
import { z } from "astro:schema";

const resend = new Resend(RESEND_API_KEY);

export const server = {
  sendMail: defineAction({
    accept: "form",
    input: z.object({
      name: z.string().min(1, "Name is required"),
      email: z.string().email("Invalid email"),
      message: z.string().optional(),
    }),
    handler: async (input) => {
      try {
        const { name, email, message = "" } = input;

        await resend.emails.send({
          from: FROM_EMAIL,
          to: TO_EMAIL,
          subject: `New contact message from ${name}`,
          html: `
            <h2>New contact message</h2>
            <p><strong>Name:</strong> ${name}</p>
            <p><strong>Email:</strong> ${email}</p>
            <h3>Message:</h3>
            <p>${message.replace(/\n/g, "<br>")}</p>
          `,
        });

        return { success: true, message: "E-mail sent successfully ✅" };
      } catch (error) {
        return {
          success: false,
          message: "There was an error sending the e-mail ❌",
        };
      }
    },
  }),
};
What’s happening here?
- We instantiate the Resend client with the API key defined in our environment variables. Notice the import of the env vars uses
astro:env/server. If we tried to import this in a script that runs on the client, it would fail (you’d seenet::ERR_ABORTED 500 (Internal Server Error)in the browser console). This is very helpful to prevent security mistakes. - We define a
serverobject with the actions we want to expose and export it. - In this case, the
serverobject has an action namedsendMail. - In that action we specify:
- We’ll read data from a form.
- We add basic validation with zod (already integrated in Astro): name is required, email must be valid, and message is optional.
- In the action handler, we extract the form data and use the Resend client to send the email.
One important note: we should compile the project again (or if npm run dev is already running in watch mode, it will rebuild on save), because Astro will once again generate type definitions for this file to make consuming it more comfortable.
6. Connect the form with the action
Now go back to src/pages/index.astro and connect the form to the action we just created:
- Give the form an id so we can reference it from JavaScript.
- Set the
methodto POST. - Add a script that captures the form’s submit event. Here’s what it does:
- Prevents the default form behavior (so it doesn’t do a full-page POST on submit).
- Gathers the form data.
- Invokes the
server actionwe defined earlier to send the email. - Adds an
awaitto wait for the server call result. If it succeeds, it clears the form (we could also display a success message).
-     <form method="POST" class="grid gap-4">
+     <form id="contact-form" method="POST" class="grid gap-4">
        ... same form content ...
      </form>
    </body>
  </html>
+ <script>
+  import { actions } from 'astro:actions';
+  const form = document.getElementById('contact-form');
+  export const handleSubmit = async (event: Event) => {
+    event.preventDefault();
+    const form = event.target as HTMLFormElement;
+    const sendFormData = new FormData(form);
+    const result = await actions.sendMail(sendFormData);
+    if (result.data?.success) {
+      form.reset();
+    }
+  };
+  if (form) {
+    form.addEventListener('submit', handleSubmit);
+  }
+ </script>

<style>
This is a basic example. If you want to go further, you could improve the UX by showing success or error messages, or validating the form with JavaScript.
We opted to handle the form submission with JavaScript because this form is usually inside a component, and it’s simpler to keep all the logic in one place. This way, we also keep the site fully static.
Wanna try it?
npm run devPure HTML alternative
If we wanted, we could do it directly in HTML and run actions based on the Server Action result. However, in that case the entire page would be processed on the server. Also, to redirect to another page using Astro.redirect(), the action must be handled from an Astro page. You can see the difference if you build after each example.
Here’s an example of sending the form without relying on JavaScript and using the action directly in HTML (note: this page would stop being static and become SSR):
index.astro
---
import { actions } from 'astro:actions';
import { ClientRouter } from 'astro:transitions';

export const prerender = false; // Needed to use server actions in HTML

const result = Astro.getActionResult(actions.sendMail);
if (result?.data?.success) {
  return Astro.redirect('/');
} else if (result?.error) {
  console.error('Error sending email:', result.error);
}
---

<html lang="en">
  <head>
    <meta charset="utf-8" />
    <link rel="icon" type="image/svg+xml" href="/favicon.svg" />
    <meta name="viewport" content="width=device-width" />
    <meta name="generator" content={Astro.generator} />
    <title>Astro</title>
    <ClientRouter />
  </head>
  <body>
    <h1>Astro</h1>

    <form id="contact-form" method="POST" action={actions.sendMail}>
      <input name="name" type="text" placeholder="Name" required />
      <input name="email" type="email" placeholder="Email" required />
      <textarea name="message" placeholder="Message"></textarea>
      <button type="submit"> Send </button>
    </form>
  </body>
</html>

<style>
  form {
    margin-left: auto;
    margin-right: auto;
    display: flex;
    flex-direction: column;
    gap: 20px;
    max-width: 500px;
    margin-top: 20px;

    input {
      padding: 10px;
      font-size: 16px;
      border: 1px solid #ccc;
      border-radius: 4px;
    }

    textarea {
      padding: 10px;
      font-size: 16px;
      border: 1px solid #ccc;
      border-radius: 4px;
      min-height: 100px;
    }

    button {
      padding: 10px;
      font-size: 16px;
      background-color: #007bff;
      color: white;
      border: none;
      border-radius: 4px;
      cursor: pointer;
    }

    button:hover {
      background-color: #0056b3;
    }
  }
</style>
🚀 Conclusions
Astro’s Server Actions are ideal when you want to add a small server-side logic layer to an SSG or SSR project without building a full backend.
In summary:
- You gain flexibility.
- You keep your project lightweight.
- You don’t compromise the security of your keys.
You can check the complete example code on GitHub:
👉 Example repository
Before running it, remember to configure your .env file at the project root.
Published by the Content Island team
Content Island — a headless CMS to create, manage, and connect your content.